I receive commissions for purchases made through links in this post.
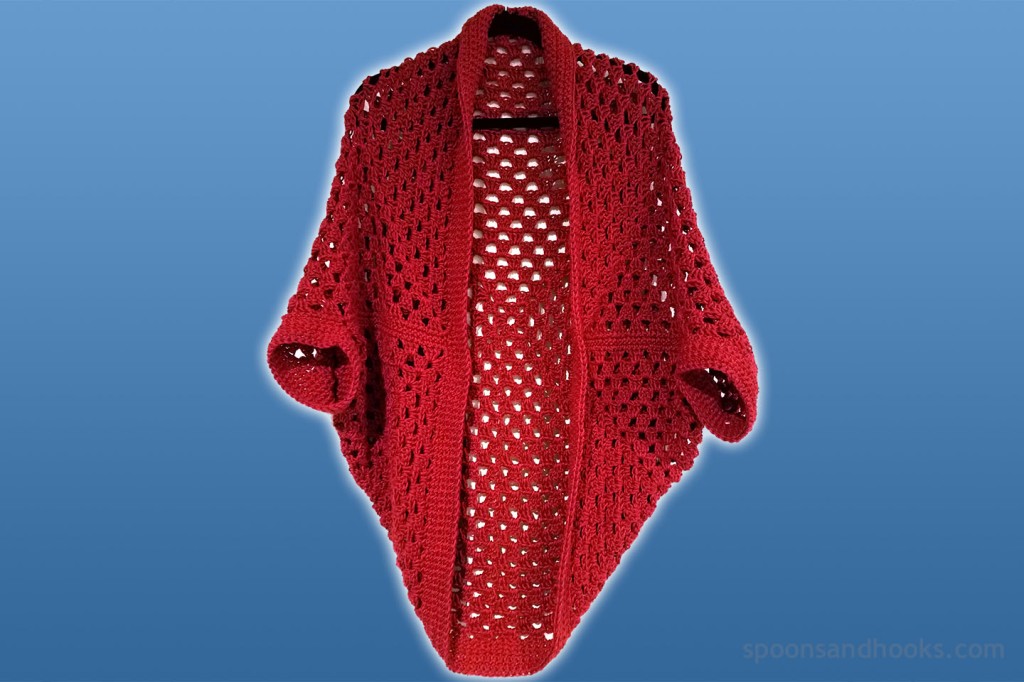
One of the great things about the granny square cocoon cardigan is that it can be made in just three simple steps by anyone who has mastered basic crochet skills: chain stitch, slip stitch, single crochet and double crochet.
Another great thing about this pattern is that it’s so forgiving that gauge doesn’t matter. To get the correct size, all you need to do is make your granny square at least half as tall as the intended wearer of the cardigan, plus an extra inch or two. That’s step one.
To get the correct size, all you need to do is make your granny square at least half as tall as the intended wearer of the cardigan, plus an extra inch or two.
Step two is to fold the granny square in half and stitch up the side seams, leaving openings for armholes. Step three is to add a border of six rows of single crochet around the armholes and the front opening. That’s all there is to it!
The sample cardigan shown here, intended to be worn by someone who is 5’4″ (64″) or shorter, is based on a 33″ granny square made from 4 skeins of Lion Brand’s Heartland yarn, which works particularly well for this pattern. (It comes in numerous colors; I used the color “Redwood.”) To make a cardigan for someone taller than 5’4″ using this yarn, I recommend getting 5 skeins.
Here is a two-minute video showing the pattern basics. The written pattern follows below.
Pattern: Granny square cocoon cardigan
Materials you’ll need:
- 4 or 5 skeins of Lion Brand’s Heartland yarn
, depending on intended size of cardigan, or 1000-1250 yards of a medium weight (#4) yarn of your choice
- Size J crochet hook
- Scissors
- Measuring tape
- Yarn needle
Stitches used
- Chain stitch (ch)
- Slip stitch (sl st)
- Single crochet (sc)
- Double crochet (dc)
To connect new skeins of yarn, I recommend using the Russian Join, which reduces the number of weave-ins required. Watch this video for a quick tutorial:
Step 1: Crochet a BIG granny square
Ch 6 and join in a ring with sl st.
Round 1: Ch 3 (counts as 1st dc here and throughout), 2 dc in ring, ch 2, * (3 dc in ring, ch 2) 3 times, sl st in top of starting ch 3.
Tip: Lay yarn end along ring and crochet Round 1 over it for an effortless weave-in.
Round 2: Ch 3 and turn, (2 dc, ch 2, 3 dc) in ch 2 space to form a corner, (ch 1, 3 dc, ch 2, 3 dc) in 3 remaining ch 2 spaces, ch 1 and sl st in top of starting ch 3.
Round 3: Ch 3 and turn, (2 dc in ch 1 space), (ch 1, 3 dc, ch 2, 3 dc) in each ch 2 space in corner and (ch 1, 3 dc) in each ch 1 space on side, ch 1 and sl st in top of starting ch 3.
Repeat Round 3 until square reaches desired size.
Final round (“binding”): Ch 1 and turn, sc in each dc and through each ch 1 space on sides; in corners, 4 sc through ch 2 space; sl st in starting ch 1, cut 6” tail and fasten off.

Step 2: Stitch together sides forming armholes
Fold square in half with right sides together to form a rectangle, taking care to align 3 dc clusters and ch 1 spaces to the clusters and spaces on the opposite side.
Note: If you made your granny square using the above instructions in which you turn the work after every round, both sides will probably look pretty much the same, and you can pick whichever side you like best to be the “right” side.
Beginning 7” from fold, single crochet through all loops of “binding” (final round sc) to end of side and through first 2 ch of corner only.
Note: Beginning 7” from fold creates a 14” armhole which will fit most. If necessary, the armhole size can be adjusted smaller or larger by starting the side seam closer to or farther from the fold.
Cut 6” end and fasten off.
Repeat on other side.
Step 3: Add borders.
For the front opening and both armholes:
Round 1: Join yarn with sl st in sc “binding” near one of the side seams made in Step 2, ch 1, sc in each sc of “binding” until you reach ch 1, sl st in ch 1.
Tip: Crochet Round 1 over yarn ends left from binding and side seams for effortless weave-ins.
Rounds 2-6: Ch 1 and turn, sc around front opening until you reach ch 1, sl st in ch 1.
Cut 6” end and fasten off.
Weave in ends. (If you crocheted over all previous yarn ends, and used the Russian join to add new skeins of yarn, you should only have three ends left to weave in.)
If you use this pattern…
I would love to see any cardigans made from this pattern! You can email photos to spoonsandhooks@gmail.com. (Note: I’ll assume that sending me photos gives me permission to share them on the Spoons & Hooks site and social media — crediting you, of course — unless you specifically instruct me otherwise.)
Do you have any questions about this pattern? If so, ask them in the comments section, and I’ll do my best to respond promptly.
You are free to gift, donate or sell for profit any items you make from this pattern. I ask only that if you sell items made from any of my patterns, as a courtesy you reference spoonsandhooks.com as the pattern’s source.
See also my variation on this pattern, the self-striping granny square cocoon cardigan.
Thank you for the pattern. I am looking for one like this.
LikeLike
Will this work for someone who is a 3X?
LikeLike
Mara – I have not made it in that size, but this is a loose and forgiving cardigan and I see no reason why you shouldn’t be able to. My advice is when you’ve made your square, before you stitch the seams, pin them and try it on, and then make it bigger if necessary (have extra yarn for this). You may want to adjust the armholes also. If you try it, I’d love to know how it works out!
LikeLiked by 1 person
Nina…… has Mara showed you it in this size?? The size 3X or higher??
LikeLike
No, I have not yet seen one I know for sure to be size 3X or larger. I HAVE seen one made for a woman who is 6 ft tall, and from the photo it looked like it was at least a size 1X or 2X — and it looked really good. The person who made it said she used nearly 2 whole Caron Big Cakes. Sorry I can’t be of more help.
LikeLike
This will be my first try making anything wearable. Im a little nervous starting out. I’m making this for my 16 yr granddaughter. I will let you know how it turns out. Wish me luck😊
LikeLike
Good luck!
LikeLike
YES! How you adjust the pattern depends on your measurements. I’m short and round, So I have to do a rectangle or it’s too long. If you’re 5’5 or taller, just measure the largest part of yourself( hips, waist, or bust), subtract 6″, and that = the size square you need to make. My square, for a 3X is usually 54″ (+ a 3″ collar/border). That just fits my taller 3X’s. You can always add extra rows of trim to make it fit, too, in case you misjudge. Do an increase (2 stitches in the same stitch every 10t stitch) on the first row, then repeat the rows for the boarder pattern you used.
LikeLike
I can’t copy this. Please help
LikeLiked by 1 person
Dortha – what do you need help with, exactly?
LikeLiked by 1 person
Dortha, om the top row ,where the address bar is,do you have thre dots on the top right of the address bar??? If you click on that a drop will open up and there should be options,and one SHOULD be SHARE , its there that you can copy or send it to your email or FB messanger…..
I hope this has helped you to get your copy of this!!
LikeLike
Many thanks for this pattern. The instructions are so beautifully explained. Hooking it slowly due to carpel tunnel but know this is achievable. Can’t wait to see what you come up with next 🙂
LikeLike
Thanks Suzie! When you’re done, I’d love to see a photo of your cardigan!
LikeLike
Is there an adjustment I can make to the pattern to make the sleeves wrist length? Thank you for your help and pattern.
LikeLike
Dee – I’ve never done it myself because I prefer three-quarter sleeves, but I have seen some people create a sleeve after sewing the sides together to form the armholes, by continuing the granny style stitch around just the armholes until they reach the desired length. Hope this helps!
LikeLiked by 1 person
Love pattern, but was wondering if i was possible to use bulky or super bulky yarn with larger hook. Thnk you
LikeLike
Linda – I’ve never tried bulky yarn – I’ve always used 4 weight yarn – but I don’t see why you couldn’t make this with bulky yarn and a larger hook, as long as the resulting fabric is pliable and not stiff. If you try it, let me know how it goes!
LikeLiked by 1 person
que medidas debe tener el cuadrado grande, no se como miden yo en centímetros,gracias por la ayuda
LikeLike
Maria Eva – Para el tamaño del cuadrado grande, usa la mitad de tu altura y agrega unos 5 centímetros.
LikeLike
Pingback: Crochet Project Ideas 2018 - Relentlessly Purple
Hello Thank you for sharing your lovely pattern. I have a question? How do you stitch the seams? Sorry to be so thick. First pattern I have followed.
LikeLike
Hi Pat – the seams are stitched with single crochet. This is described in step 2 of the pattern.
LikeLike
Thank you Nina it looks quite wide with a single crochet. When opened up. Could it be crocheted with a different stitch.?
LikeLike
Pat – I chose single crochet because it’s easy and it makes a good firm seam, but you can do the seams in whatever stitch works for you.
LikeLike
Thank You will try it and see how it goes, thank you for your time.
LikeLike
Confuse not much of pattern reader – I have my square and ready to do sleeves – do I single crochet to the end to close the side and rotate to come back up to do the six rolls first
LikeLike
Yolanda – I’m not sure I understand your question. I would stitch together both sides to form the armholes first, and then go back and add the borders to both armholes and front opening. Is that what you need to know?
LikeLike
I think I got it – if not I will get it – thanks
LikeLiked by 1 person
Great pattern. I have started it. I am 3xl so fingers crossed. I will let you know how it turns out. Thank you
LikeLike
Evelyn – let me know how it works for you!
LikeLike
I did it. I’m so pleased with the outcome. I’ve took photos but not sure how to upload to show you. I’m a plus size and made it a little bigger than you suggested it was 40″ square. Thank you so much for pattern 😊
LikeLike
I think I added a photo on the pattern 😊
LikeLike
Hi Nina, I am so happy I found your pattern! Your Directions are so clear, video is great. You, me, my yarn and Netflix!
LikeLike
Christine – Glad you like it!
LikeLike
I have started making me a 3xl hoping that it turns out good. I love the way this cardigan looks.
LikeLiked by 1 person
I am so excited about this sweater!! Thank you so much for posting the pattern!!! I am in the process of making my first. I will post a pic when it is finished.
LikeLike
Can wait to see it!
LikeLike
Great pattern and great gift idea for xmas Nina. Can’t wait to start making them!!!! Thanks 👍👍😊
LikeLike
Thanks! I’m so glad you like it!
LikeLike
I stumbled on this gem on Pinterest, it got me so excited! It is 6:15 in the morning in Botswana, I can’t wait for the stores to open so that I can get my wool and get started!
LikeLike
Taboka – I’m so glad you like it! I’d love to see a photo of what you make.
LikeLike
Thank you for the beautiful cardigan, but was wondering how far down the arms go, thank you again
Shelley
LikeLike
They are about 3/4 sleeves.
LikeLike
Thank you, you are so sweet to get back with me so soon. If I don’t text you before Christmas, have a Merry Christmas and New Year
Shelley
LikeLike
This is my first cardigan and love how easy your pattern is to follow especially for a new by like myself. I have used wool that fades in and out of white, Grey’s and black. Can’t wait to try it on. I’m sure it will be my first of many.
Regards
Suzanne Pitt
LikeLiked by 1 person
I guess it is optical illusion but the pic messed me up a bit despite the instructions because your square looks like a rectangle lol however I am doing it right now and so far it seems ok. Thank you so much for posting this.
LikeLike
I am a 3X and I will be making this for myself. to adjust for my large stomach and arms, I will make the granny square several inches larger than 1/2 my height. (I am starting with a full foot,12″ larger, that way, I will have a little ‘wiggle’ room)
Thanks for such an easy to follow pattern! (sorry, I have no way of taking a picture and posting)
LikeLike
Wow I love this cardigan. Thank you for the pattern it looks so easy. I’m 5ft 2 so I’m going to follow your pattern exactly to see how it turns out, I’ll let you know. I’m off to the shops to buy the yarn. Now to decide what colour to buy, something summery I think 🤔
LikeLike
Heather – I would love to see a photo when it’s done!
LikeLike
What size square do u suggest I make? I am only 5 feet tall. Please advise. Thanks
LikeLike
5 ft = 60 inches, half of that is 30 inches, so going by my pattern I would advise 31 or 32 inches. You can always pin it and try it on to be sure before moving to the next step.
LikeLike
I made this but now I would like to try it with Crochet thread #10 do you think this will work as long as I get
the granny square big enough.
LikeLike
Peggy – I haven’t worked with #10 crochet thread myself so it’s hard to say. My only concern is that the resulting granny square might bee too lightweight to wear properly. If you try it, let me know. Good luck!
LikeLike
Thank you,I love this!
LikeLike
This is the best pattern I’ve found for shrugs, simple and straightforward making it a breeze to put together! I just finished it except for the collar borders and bottom and I’m amazed at how great it fits and looks on, thanks so much and keep these great patterns coming, yaaaaaay!
LikeLike
Suzan – I’m so glad you like it and find it useful!
LikeLike