
Download the free pattern at:
ravelry.com/patterns/library/self-striping-granny-square-cocoon-cardigan
I receive commissions for purchases made through links in this post.
I developed my original pattern for the granny square cocoon cardigan using a solid color heather yarn, Lion Brand Heartland. Then I decided to see what would happen when I made the same pattern using self-striping yarn. I wanted to make a birthday present for a dear friend and chose a Caron Cake yarn with five colors in approximately equal amounts – three blues and two grays. My intent was for the colors to fan out from the center of the back in roughly concentric squares, like this:

And come together in interesting angles on the front, like this:

My original pattern is based on turning the work at the beginning of each round, resulting in a granny square with no wrong side (or two right sides, however you want to look at it). For a solid-color yarn, that’s great. But when I did the same thing with the self-striping yarn, it wasn’t long before I realized I was not getting concentric squares. Instead, the colors doubled back on themselves each time I changed direction at the beginning of a new round. As the square got bigger, the colors began “bunching up” on one side or the other.
Not that there’s anything wrong with that – it’s an interesting effect – but I had my heart set on those concentric squares, and I had no desire to “slice and dice” the yarn to get them. (All those extra ends to weave in – not fun!)
I realized that to achieve what I wanted, I needed to adjust the pattern so I never turned the work, but always kept the yarn moving in the same direction. That way, the colors wouldn’t double back on themselves each time I began a new round.
A demonstration
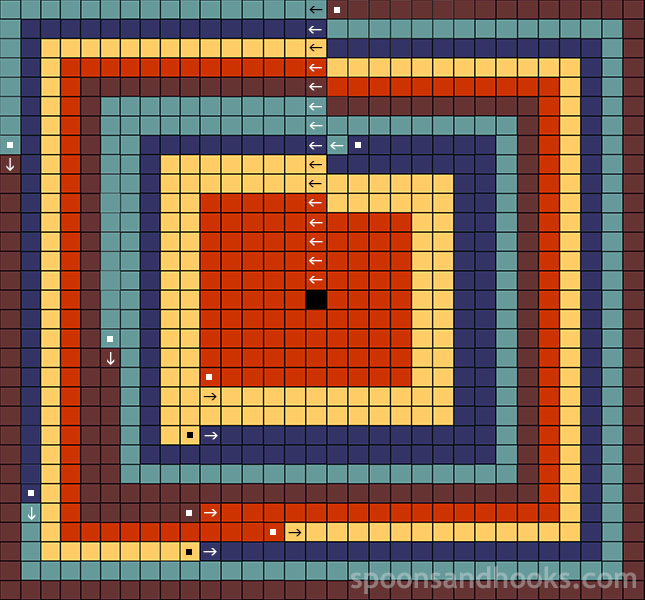
I created the two diagrams below to demonstrate what happens when you crochet a large granny square with self-striping yarn and either turn the work for each round, or don’t turn it and keep the colors moving in the same direction.
In both diagrams I used equal amounts of five colors, filling the grid from the black center square outward in rounds like a granny square. The arrows show the beginning of rounds and colors changes, as well as the direction they are moving; the little squares indicate where each color ends.
This first diagram shows what the colors do when the work is turned and the direction of the color reverses at the beginning of each round, as indicated by the arrows. Notice how the concentric squares break down as you move outward from the center, and the colors eventually bunch up on one side or the other:

In this second diagram I filled in the colors in a continuous counterclockwise direction, again as indicated by the arrows. Notice that while the concentric squares are not perfect, they do hold up pretty well:
The result
Once I figured this out, I frogged what I’d done (thankfully, not too much) and started over, never turning the work but always working counterclockwise. In order to do this, I had to start even-numbered rounds differently than I did odd-numbered rounds. And when the granny square was complete, because it was never turned it had a definite right side (the side that faced me as I crocheted) and a wrong side.
Except for these two small differences, the pattern is the same as for my original granny square cocoon cardigan, including the recommendation to make the granny square at least half the height of the intended wearer, plus an extra inch or two. (You can make it bigger, as some patterns suggest, but I’ve found that my formula results in a nice bottom-covering length and 3/4 sleeves, and doesn’t risk overwhelming the wearer.)
As with the original pattern, you can make this cardigan in just three easy steps with only advanced-beginner level crochet skills.
Some final notes about the yarn
Because I was trying out a new pattern variation, in an abundance of caution I bought five Caron Cakes, which totals about 1915 yards of yarn – much more than I needed. In fact, I completed the 36″ granny square using just 2-1/2 cakes. I could have done all of the binding, stitching and borders using the remaining half of the third cake, but I wanted the binding and stitching to be all the same color in which the granny square ended (the dark gray) and the borders to be all the next color (the light gray), so to get those colors I did do a minimal amount of “slicing and dicing” of the remainder of the third cake and a tiny amount of the fourth cake. What’s left of the third and fourth cakes is plenty for some small future project. I returned the untouched fifth cake for a refund.
Finally, when selecting your Caron Cakes (or other self-striping yarn), pay attention to the colors in which each skein begins and ends, and make sure they correspond. That is, if the first skein ends in, say, dark blue, you want the second skein to begin in that same dark blue, and so on.
You are free to gift, donate or sell for profit any items you make from this pattern. I ask only that if you sell items made from any of my patterns, as a courtesy you reference spoonsandhooks.com as the pattern’s source.


Leave a comment